How To Make A Piñata
Countries as diverse as China and ancient Aztec cultures developed traditions similar to our modern piñatas. This fun party game is popular with all ages, and making your own only adds to the fun! Preschoolers especially enjoy building piñatas. They like to see their creation take form, but they do need a lot of supervision!
Remember to start about three days early, and follow these easy instructions!
1. Gather Paper-Mâché Supplies: a large balloon (or more than one, depending on the shape you're making--this tutorial will show you how to make a spider-shaped piñata!), newspaper strips about 1" wide and 4-8 inches long (younger children work better with shorter strips), water, and flour.
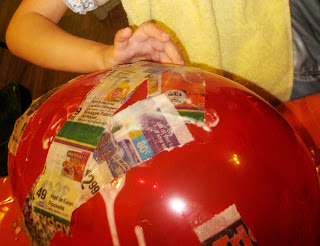
2. Mix Paper-Mâché Goop: Use equal parts water and flour. Start with about 1 1/2 cups of each and stir them together in a bowl with a fork or your fingers. (Alternatively, if you want the piñata to last a particularly long time, you can use a water/glue mixture--again, use about equal parts water and glue.)
3. Blow up your balloon and prop it up in a large bowl.
4. Dip a strip of newspaper into the paper-mâché goop. Wipe as much goop as possible off between two fingers. Pat the strip onto the balloon. Continue until the balloon is completely covered, except for a small circle at the top. The open circle will become the opening for you to pop the balloon and stuff the piñata with goodies!
5. Let the paper-mâché goop dry completely. This usually takes at least 12 hours, and can take much longer, depending on your humidity.
6. Repeat steps 4 and 5 for another layer of strength. Two layers is usually more than enough for a medium sized group of preschoolers. After it is completely dry, pop the balloon!
7. Paint the piñata or cover it with a layer of small pieces of construction paper or crepe paper. We used purple tempera paints and sponges--paintbrushes simply take too long for most preschoolers!
8. Poke a tiny hole in the piñata opposite the opening at the top. Thread a piece of yarn through the body of the piñata and out both the tiny hole and the opening at the top. This will let you hang the piñata easily.
9. Fill the piñata with your favorite treats and prizes.
10. Attach any additional decorations! For a spider's face, use a black piece of cardstock with wiggly eyes. For spider legs, cut 11 inch long strips of black cardstock. Use hot-glue to attach the face over the opening and legs on the side.
11. Hang it up and party!!


Comments