Rockets for Preschoolers!
These rockets for preschoolers are fun, easy, and perfect for space and solar system themes...they're also loads of fun to use as "fireworks" during the New Year and the 4th of July! It's also loads of fun for a summer camp or "boredom buster"! And if you have older kids, building the launcher is a wonderful STEM challenge or STEM activity!
Okay, I'll confess: it isn't just for preschoolers...I've made these stomp rockets with kids from 1-17 years old, and they all love them! You learn about different things with each age group, but every child I've known loves to shoot them into "space!" Preschoolers especially love watching their little stomp send their rocket flying higher than a 2-story home! The set-up takes a little time, but the excitement is so worth it! When you're done, you can store the launcher in your garage and pull it out any time!
First, let's make the launcher.
- 1/2-inch PVC Pipe. You need six pieces. The measurements aren't critical, but I had 5 pieces about 2 feet long and 1 piece about 5 feet long. My hardware store cut them for me when I bought them.
- 1/2-inch PVC Pipe Joiners. You need the following 4 pieces:
- * 4-way joiner
- * (2) 45 degree elbows
- * 90 degree elbow
- duct tape
- 2-liter bottle (empty)
How to Make a Stomp Rocket Launcher:
This is simple...I promise!
Here's the completed launcher with parts labeled, for any of you visual people. After the picture are instructions.
The launcher is made in two parts: 1-the actual launcher and 2-the supports.
1-To first make the launcher, twist the 2-liter bottle onto the 5-foot long PVC pipe. Duct tape it on to make sure no air can escape this joint.
2- Twist the 90 degree elbow onto the other end of the 5-foot long PVC pipe.
3- Twist one of the 2-foot long pieces into the 90 degree elbow. Duct tape this joint to make sure no air can escape. Your launcher is done! Yay! But it tips over. So, let's make the supports:
4- To make the supports, drop the 4-way joiner onto the launcher. You now have 2 openings on the 4-way joiner exposed. Twist 2-foot long PVC pieces into those openings. Duct tape them on so they don't fall off, but do not duct tape the 4-way joiner onto the actual launcher. You want this removable so it stores easily.
5- Twist a 45 degree elbow onto the ends of the 2-foot long pieces.
6- Twist the last 2-foot long pieces into the 45 degree elbow.
Ta da!! All done!
Now you can invite the kids to join you in making rockets!
Supplies for Rockets:
- computer paper
- masking tape
- crayons or other decorative supplies
DIY Rockets:
1. Decorate a paper!
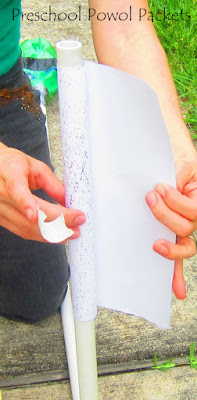
2. Wrapt the paper around the PVC pipe and tape it closed. Be careful to make it tight enough that it will catch the air, but loose enough that it will move on and off the pipe.
3. Tape the rocket closed. Tape over one end of the rocket several times so no air escapes the top.
To Launch a Rocket:
1. Place the rocket on the top of the launcher.
2. Stomp down on the 2-liter bottle, right on top of the duct tape!
3. Watch your rocket soar!!
4. If the bottle doesn't re-inflate by itself, you can blow up the bottle again by blowing through the top of the launcher. You can also easily clean this off with baby wipes. ;)
Note: If you want a launcher that doesn't need blowing up, you can attach a bicycle pump, air storage tube, and a valve instead of the 2-liter bottle. But I think that's unnecessary.
Here's a video of the launching happening:
Happy Educating, Carla
I may share at any of these parties!


Comments
I love the Enchanted Thursday Hop! and I bet your husband's class will love the rockets too! I hope you get to join in the fun too! ;)
~Andrea
http://www.nodoubtlearning.blogspot.com/2012/03/paper-airplanes-with-twist.html
Lori @ Cachey Mama’s Classroom
Andrea, I love the stomp too! Anything that brings a physical element to an activity gets a thumbs up in my book!
Lindsi, I hope you guys have time to try it! and I did link up at Toys in the Dryer! Thanks for the invite!
PlainVanillaMom, I have done this with teenagers who LOVE it! The cool thing about teenagers is that they can make the launcher, too. ;)
Shiloh, That's pretty cool that you have PVC at your house already! You can make it with less than I did--you just need to have a launcher and a support, but you can design the supports in many ways. This is just simplest for me. ;)
Thanks, Lori! My 1-year old stomps his rocket about 7-8 feet high! Though, he does have a pretty intense stomp! ;) I bet your little guy would love it...and if not, I'm sure your preschoolers would!
Thank you for linking up to A Pinteresting Party! :) Hope to see you again!